
How to Add Keyframes in Alight Motion (2025) Easy Guide
Introduction to Keyframes in Alight Motion
Alight Motion APP is a video making APK that is one of the well-known video-making apps available these days. It provides a wide range of amazing features for both beginners and experienced users. This app helps users to edit photos, combine many images to form a video, or add audio and animations.
To Add keyframes in Alight Motion is the backbone of animation. They offer you to control the movement, transitions, and effects in your videos. By mastering keyframes, you can bring your ideas to life and create visually stunning content.
Want to explore more animation options? Check out how to remove backgrounds in Alight Motion using advanced tools.
What are Animations?
Animations are the magic tricks that make videos stand out. These special effects can:
The purpose of animation is to grab the attention, illustrate a point, add visual interest, or tell a story. In video editing the animations are generally categorized as:
Animations may be either simple or complex, depending on your needs, they make your videos more engaging, fun and memorable.
✨ Master the basics before diving deeper — learn how to add shapes and audio to your animations.
Different Types of Keyframes in Alight Motion
To making smooth and professional Animations it is essential to understand the different type of keyframes. Here is a list of main types.
Hold Keyframes:
These keyframes maintain a constant value between two points. For example, if you set a hold keyframe for opacity, the object will remain fully visible until the next keyframe.
Linear Keyframes
Linear keyframes create a consistent change over time. For instance, an object will move at a steady pace from one position to another.
Easing Keyframes
Easing keyframes add a natural flow to your animations by accelerating or decelerating movement. There are three types:
Ease In:
The animation starts slowly and speeds up.
Ease Out:
The animation slows down before stopping.
Ease In-Out:
The animation starts and ends smoothly.
Detail about Position,Rotation, Scale, and Opacity Keyframes:
In Alight Motion Pro APK there are different keyframes for different properties and each has a unique role in animations.
Position Keyframes:
This keyframe is to move any object like movement from left to right or from up and down.
Rotation and Scale Keyframes:
In this keyframe an object moves around and the object becomes zoomed in/out. You can also create dramatic or spin effects as well.
Opacity Keyframe:
Using this style you can fade in or fade out any object like some time object shows sometimes it hides.
How to Add keyframes in Alight Motion
To add keyframes in Alight Motion is very easy. Following are easy steps:
Step 1: First Import Your Video or Image:
Step 2: Open the Alight Motion app and click to + sign
Step 3: Select the media file either video or image you want to animate
Step 4: Select the Object:
Step 5: Tap on the video or image layer to open its settings.
🧩 Combine this skill with trim and split video editing to create precise motion effects.
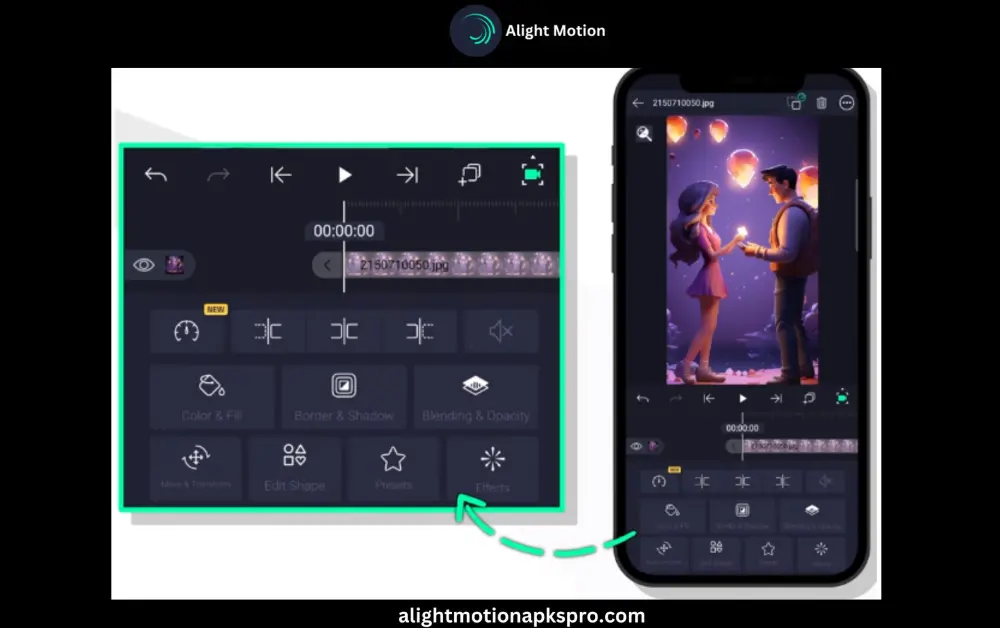
Step 6: Enable Move and Transform:
Step 7: Go to the "Move and Transform" option.
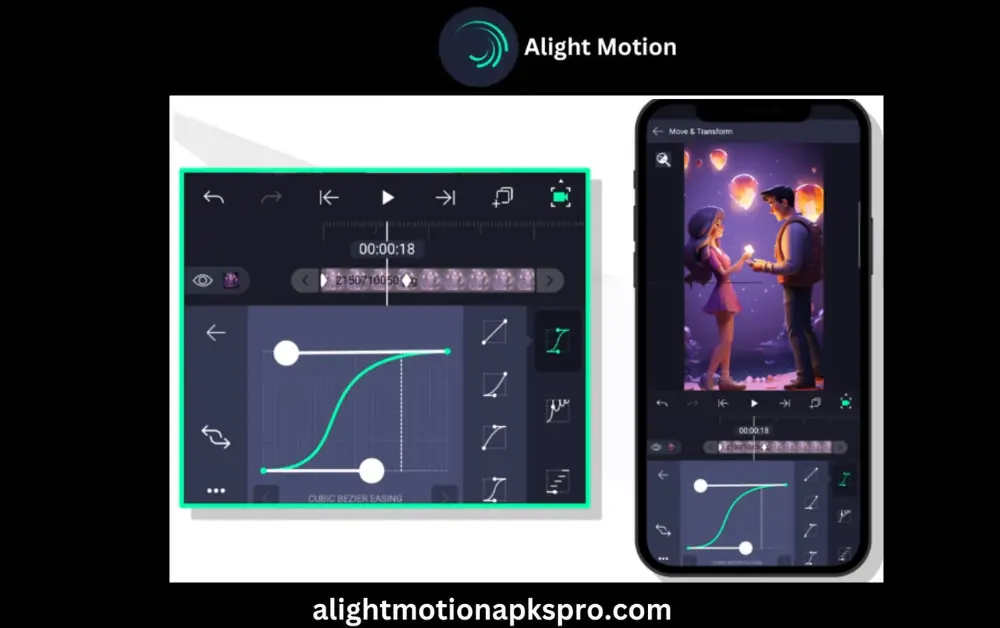
Step 8: You’ll see a track pad interface where you can move your object.
Step 9: Add Keyframes in Alight Motion Pro:

Step 10: Now Click on the keyframe symbol to set the beginning point.
Step 11: Move the timeline cursor to a new position, adjust the object’s position, rotation, or scale, and click the keyframe icon again to set the endpoint.
Step 12: Preview Your Animation:
Step 13: Play the video to see your animation in action.
By applying all these steps you can smoothly add keyframes in Alight Motion.
How do keyframes work in Alight Motion?
Keyframes are those points in the timeline where animations start or ends. When you set two keyframes in two different points then Alight Motion APK sets a smooth transition between two points and this is called interpolation.
For Example: If you set the keyframe one at the starting point and another at the ending point with rotation then the object will rotate smoothly between these two points.
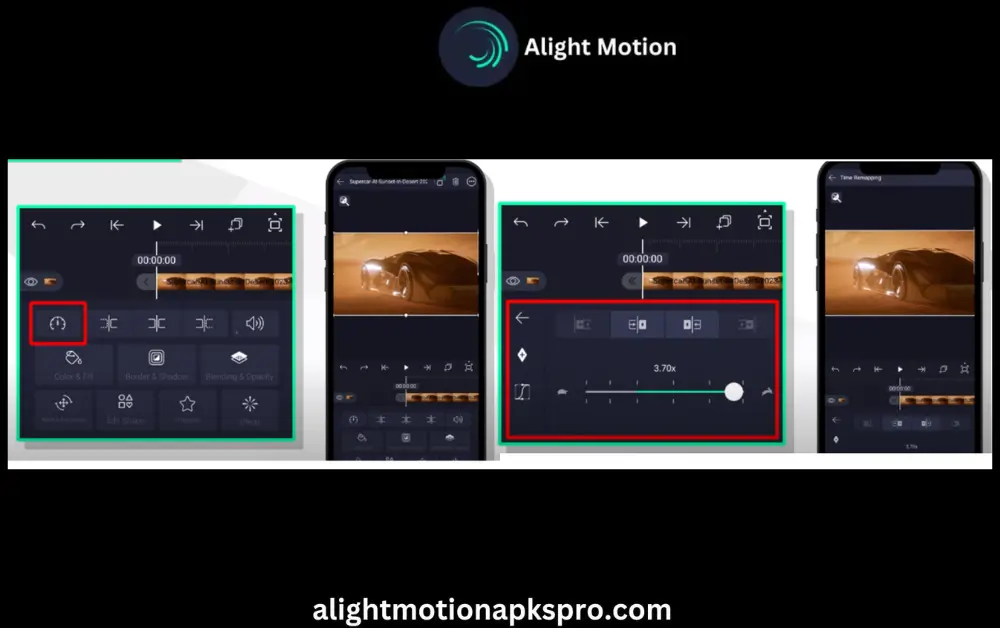
How to adjust speed or speed ramping?
Adjusting speed offers you to either slow down or speed up your video or image using Alight Motion. Follow the steps below to do it easily.
Step 1. Import a video:
Import a video or image into Alight Motion.
Step 2. Select the Media:
Click the video or image layer to open its settings.
Step 3. Adjust Speed:
See the Speed option, use the slider to increase or decrease the speed.
- If the speed is 1.0, that means it is normal, the same as that of import.
- Increasing the speed above 1.0 makes the video speed up and reduces the duration.
- Decreasing the speed below 1.0 makes the video slow and increases the duration.
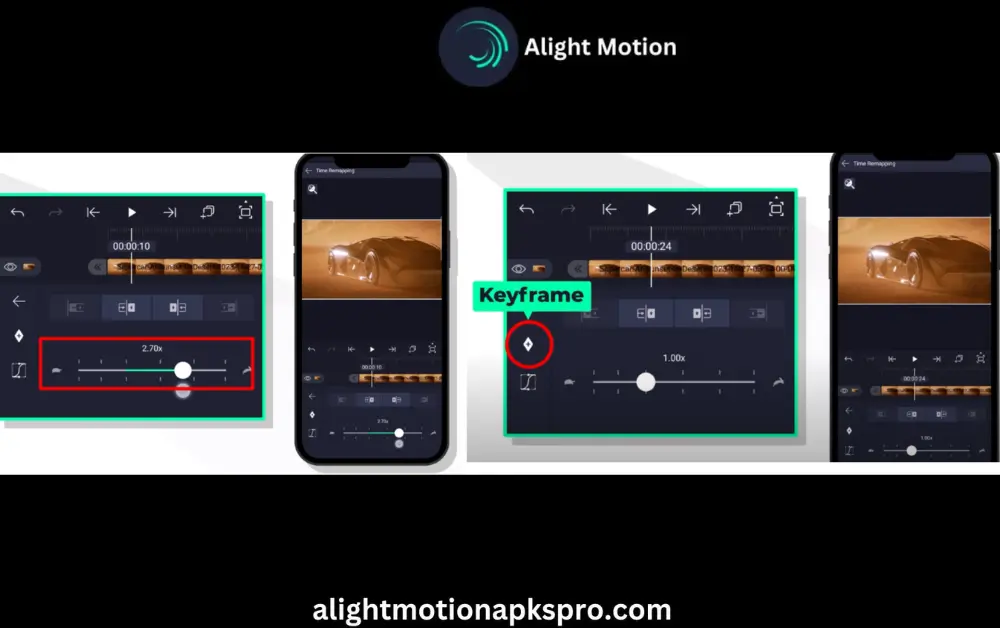
Step 4. Add keyframes for smooth Transitions:
To create smooth speed changes, add keyframes in Alight Motion at different points on the timeline.
By adding speed ramping and keyframes in Alight Motion APK, you can make a professional-looking video.
Advanced Techniques to Add Keyframes in Alight Motion Download
If you have done all the basics now try these advanced techniques to take animations to the higher level.
Masking with Keyframes:
Use keyframes to animate masks, showing or hiding parts of your video or image dynamically.
Combining Multiple Keyframes:
Layer multiple keyframes to create complicated animations, such as objects moving, rotating, and scaling simultaneously.
Using Keyframes for Transitions:
Create smooth transitions between scenes by animating elements like opacity, position, and scale.
🔧 Facing issues with the Mod version? Here’s how to fix Alight Motion errors.
Role of Graphs and Curves in Keyframe Animations:
The graph editor of Alight Motion helps in making smooth and natural animations.
📈 Linear Curve – This makes animations to move with equal speed.
⤴️ Ease In – Starts slow and ends fast
⤵️ Ease Out – Starts fast and ends slow
🔄 Custom Curves – You can draw curve manually as per your requirement.
Troubleshoot the common issues while adding keyframes
Here is the list of possible issues that you may face while add keyframes in Alight Motion and solutions.
1. Fixing Partial Animations
When the animations can feel you too sudden moveThis happens when the movement starts or stops too quickly. To fix this, adjust the easing settings. "Ease In-Out" makes the animation start slowly, speed up in the middle, and then slow down again at the end. This creates a smoother and more polished look.
2. Adjusting Slow Animations
If your animations feel too slow, reduce the distance between keyframes on the timeline or increase the speed of the object.
3. Resolving Keyframe Sync Problems
Ensure that all keyframes are aligned properly on the timeline. align them because Misaligned keyframes can cause unexpected jumps or delays.
How to export keyframe Animations?
After making final animations it is easy to export them.
Step 1. Click on the share icon.
Step 2. Select the format like video, GIF or project file.
Step 3. Choose the export setting.
Resolution: Make 1080p or 4K
Frame Rate: Choose 30fps or 60fps
Bitrate: Should be high for best quality
Pro Tip: Turn on the “Render at Maximum Quality” option for smooth transition.
📤 Once you’re done, learn how to export and share videos in Alight Motion professionally.
Useful Tips to Add Keyframes in Alight Motion
1. Experiment with Easing:
Try various easing options (Ease In, Ease Out, Ease In-Out) to get the idea about the best fit for your animation.
2.Use Shortcuts:
Get know about keyboard shortcuts to speed up your workflow when adding keyframes.
3.Preview Often:
Regularly preview your animations to catch issues early and make adjustments
How to Sync Keyframes with Audio?
If you want to run animations on music beat then follow the following steps.
Step 1. Import the audio clip on timeline.
Step 2. See the beats of the waveform after zooming it.
Step 3. Add keyframes on the peak of waveforms.
Step 4. Match beat with scale, position or opacity.
Keyframes Comparison Table
| Keyframe Type | Best For | Smoothness | Use Case |
|---|
| Hold | Static pauses | No | Text pop-ups |
| Linear | Constant speed | Yes | Background slides |
| Ease In | Starts slow | Yes | Dramatic zoom-in |
| Ease Out | Ends slow | Yes | Fades |
| Ease In-Out | Smooth start & end | Yes | Logo reveals |
Visual Demo for Keyframe Animations
Conclusion
Alight Motion is a fantastic app for making wonderful animations. To get the maximum from it, you need to learn how to add keyframes in Alight Motion. Whether you are going to adjust speed, create transitions, or experimenting with advanced techniques, keyframes are the foundation of dynamic and engaging videos.
Ready to take your video editing skills to the next level? Download Alight Motion today and explore endless possibilities!