How to Use Masking in Alight Motion (2025) – Pro Guide + Types, Tips & Tutorial
What is masking in Alight Motion?
Masking is one of the best video editing techniques by which you can hide or reveal any specific area of a video. In Alight Motion APK, masking offers you precise control over applying effects, transitions, or animations only to one part of the video without affecting the entire layer. In this tutorial, you will learn about how to use Masking in Alight Motion, and later we will learn about distortion/wrap.

➡️ If you’re new, start with our beginner-friendly How to Use Alight Motion for Free guide.
Different Types of Masking you can do?
Shape Mask:
This is one of the basic masks in which you can make a circle, rectangle, or custom shape and can hide or reveal any element of the video.
Clipping Mask:
The use of this mask is to show another layer inside a shape. I like to show the image or video clip inside a text.
Text Masking:
In this technique, you use the text like masking, by which you show the image or video clip inside a text.
Alpha & Luma Mask:
These are the advanced masks which show the effects based on transparency or brightness. Luma mask detects brightness, and alpha mask detects transparency.
Animated Mask (Using Keyframes):
In this technique, you animate the mask through keyframes so that it can move or change the shape during the video.
➡️ Learn more about how to Add Keyframes in Alight Motion for smooth animation control.
Step by step guide how to use Masking in Alight Motion Pro:
Step 1: Add a new layer:
Open Alight Motion App and add a photo or video in which you want to do masking.
Step 2: Open the masking option:
After selecting the layer choose the “masking” tool.
Step 3: Choose mask type:
According to your requirement, select shape, text, or alpha mask.
Step 4: Adjust position and feathering:
Move the mask and make the edge soft or hard using the feather option.
Step 5: Animate with keyframes (optional):
If you want to move the mask then add the keyframe in the timeline.
➡️ Master video trimming to complement your masks with our Trim and Split Videos in Alight Motion tutorial.
Detailed Explanation about how to use masking in Alight Motion APK
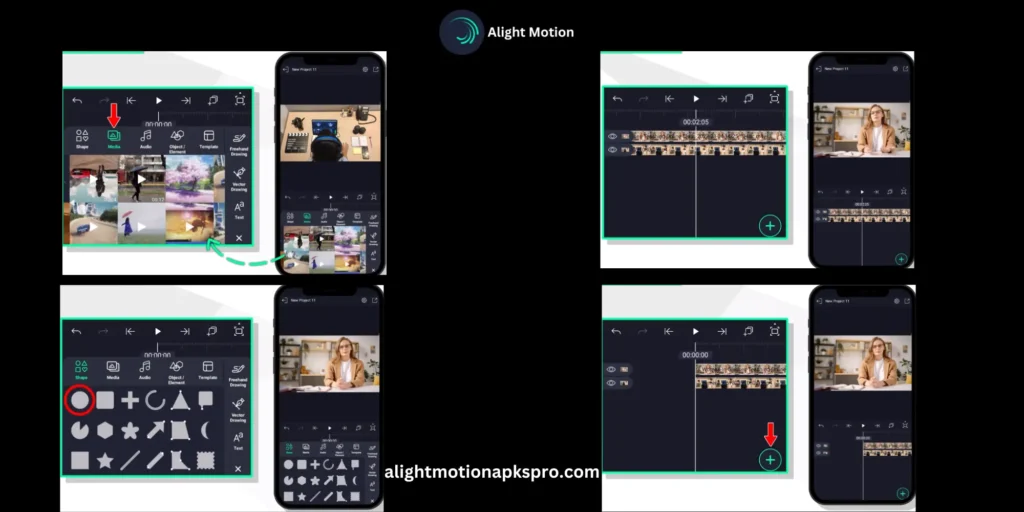
First of all import that video from the media file in which you want to do masking then click on the “+” option to import a photo or any video. Note that the video or photo you want to use for masking should be imported after the main video in which you want to do masking.
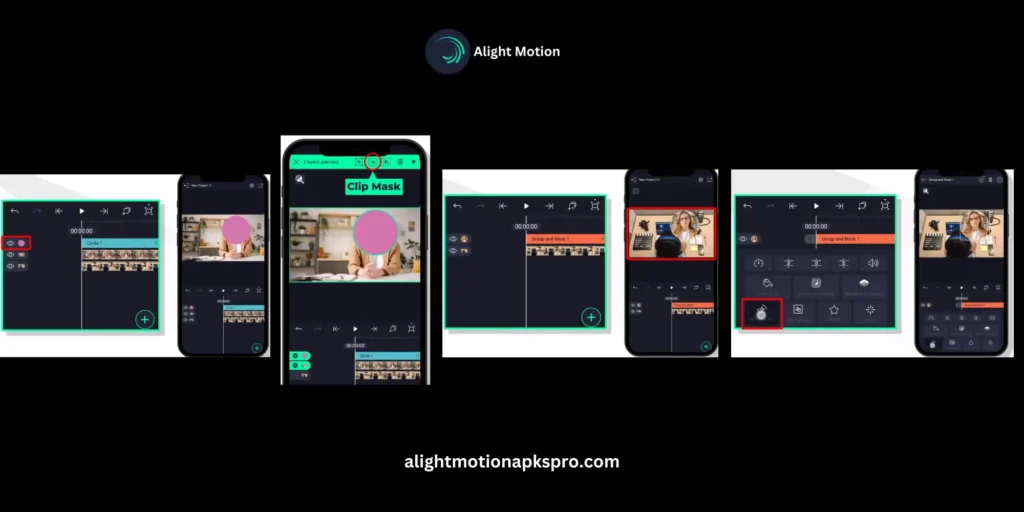
In order to mask, we use a shape for that. Click on the + option and then shape; you will find a number of shapes. Select any one of them. We are taking a circle. Click on the circle and adjust it according to your video; now, tap and hold an eye button. After selecting both the eye buttons, there is a clip mask button on the top of the screen. Click on it. Once you click on it, your video is masked inside a circle.
If you want to transfer the mask to any side of the screen, then click on the screen and click the move and transfer button. One can easily transfer masking at any point in a video. If you want to keep a masking shape on top of the screen, you can keep it. But if you want to keep the same at the button or in the middle of the screen then you can also do that.
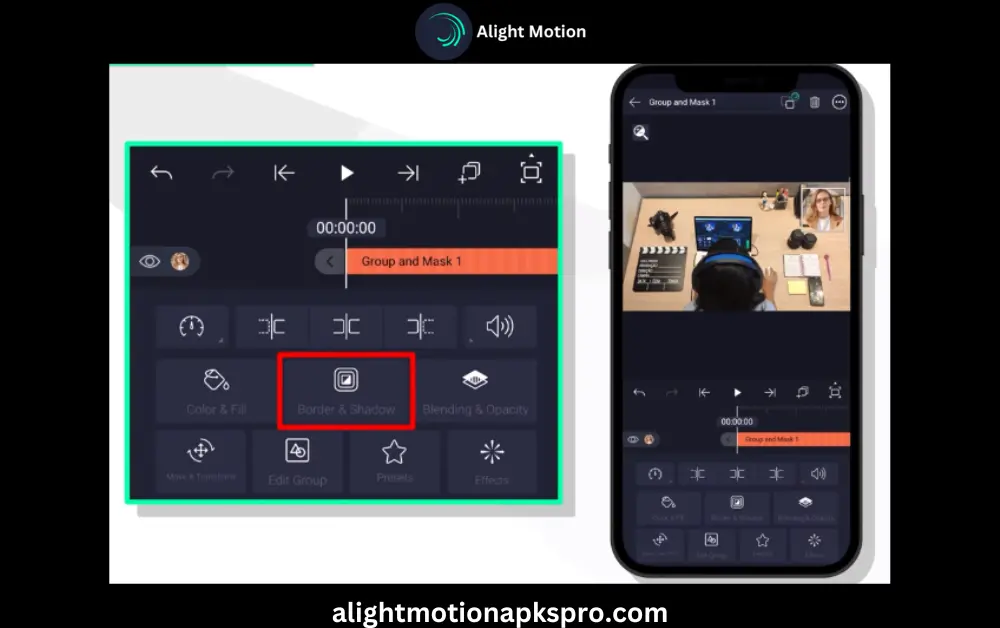
If you want to add a shadow in a masking then click on a video and then click on border and shadow and then add border click on the outside and change it color so that shadow should appear at the outside of the circle.
This is how you can Use Masking in Alight Motion videos and if you want to change the shape then this can also be done for that click on the + sign go to shape button you will find many different types of shapes and pick anyone from them and do masking on it.
Common Masking Problems & How to Fix Them:
Masking Tips for Pro Results:
Use Luma masks for dramatic lighting
In order to make Light-based transitions use the luma mask.
Combine masking with velocity edits
With Velocity you can get the cinematic feel.
Save reusable masked templates
Save the Frequently used effects to save time.
Add Keyframe for all points:
For better control apply keyframe on each motion or scale.
By following these pro tips you can perfectly Use Masking in Alight Motion.
➡️ Explore Alight Motion Tips and Tricks to enhance your overall editing workflow.
What is distortion/wrap?
Distortion/wrap is basically an effect that is used in a video editor for bending or changing the shape of an image or a video. In this effect, your picture or video will look like a straight line, becoming curvy.
Common types of distortion effects are.
- Fisheye
- Ripple
- Wave etc.
- It's a very fun way to play with images and videos and to add some visual Alight Motion effects
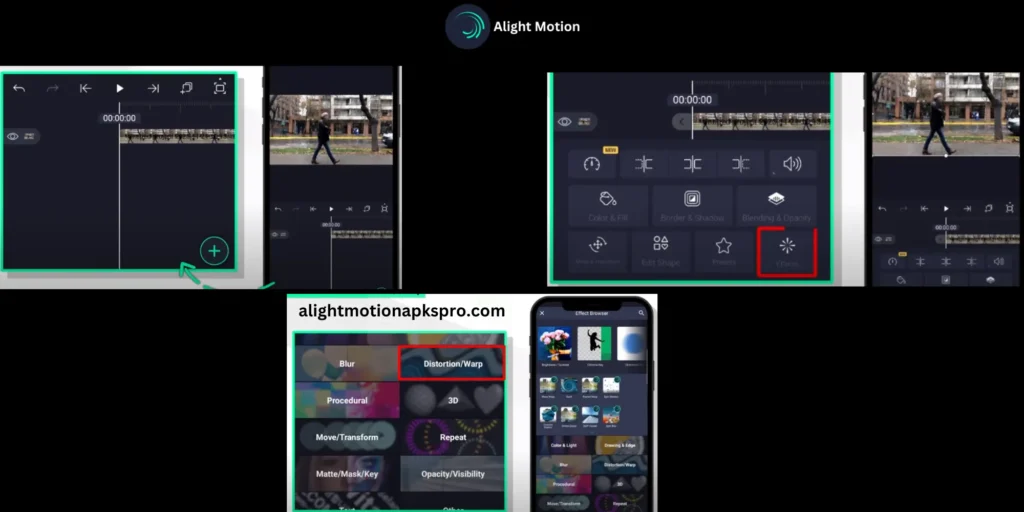
How to use Distortion or Warp in Alight Motion
First, you have to import a video in which you want to apply distortion/wrap effect. Select a video and click on effects, then click on add effects. You will find different options. Click on the distortion/wrap option. Once you have clicked, you will find a number of distortion effects and you can use distortion or wrap
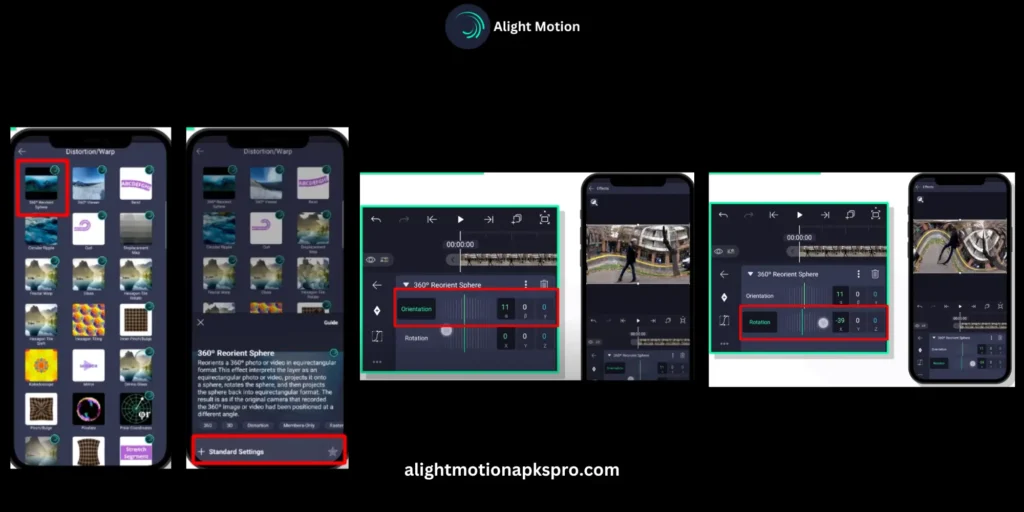
It is upto you which effect you want to select and use in your video, and after choosing a distortion effect, click on standard settings and Use Distortion or Warp.
The purpose of clicking into standard settings is that you have to apply animations on that. For that, you need to increase or decrease the orientation or rotation you will see that your video will have rotation effects it. this is way Use Distortion or Warp.
For professional grade effects better to learn about other video making apps.
There are multiple distortion/wrap effects. You can change your distortion effect in your video and play with it. If you want to make a 360 degree video, then you need to decrease the distance because it covers a maximum area, and you will feel better results. In this way you can Use Distortion or Warp.
Here is the tutorial for you about how to use Masking in Alight Motion Pro
Conclusion
we have learnt how to use masking in Alight Motion in depth about other amazing features. In this article we have clearly learnt about how to Use Masking in Alight Motion and then we have gone through how to Use Distortion/wrap effects.
You see how Alight Motion is fulfilling all the demands of video editing. If you want to learn more about Alight Motion and its various features then navigate to blog posts and click you will find the use of various interesting features. And you can also Use Distortion or Warp.
We have given the detail of all amazing features in a very easy way including how to Use Masking in Alight Motion App. We hope that you have learnt from this site.
Why are you waiting for Download latest version 5.0.270 of Alight Motion app download freely without watermark and make stunning videos.